
An AI travel montage looks coherent when its geography, weather and light belong to one place. Start by inventing that place on one approved image, then use it as a reference for two closer views. Animate modest movements, edit the three clips and label the finished work as an imagined location.
This tutorial builds a fictional coastal village: ochre houses, a pale stone promenade, one square harbour marker and calm morning water. It is an original visual exercise, not footage of a real destination or evidence of a trip. The target is an 18-second landscape film. Prompts have not been tested in Krea or Higgsfield; product documentation was checked on September 9, 2026.
Contents — jump to a section
Plan a place you can recognize from every shot
Use three landmarks: ochre houses on the right of the promenade, the sea on its left, and a square stone marker at the far end. Morning light comes from ahead and slightly right. Keep the sky clear with thin distant haze; do not turn the close-up into a sunset just because that image looks attractive.
The shots have different purposes. The first establishes the village. The second brings the viewer onto its promenade. The third notices a small wave at the same stone edge. You can suggest a visit without inventing hotels, travel advice or landmark names.
| Shot | Composition | Movement | Continuity check |
|---|---|---|---|
| Arrival | Wide village and harbour | One gentle camera push forward | Houses right, sea left, marker ahead |
| Walkway | Eye-level promenade | Light breeze moves one plain awning | Same stone and ochre paint |
| Detail | Water against the promenade edge | A small wave reaches the stone and recedes | Same light direction and calm sea |
If you want a real destination guide, use accurate source material and verify the place separately. This exercise cannot establish what a beach, hotel or viewpoint actually looks like.
1. Generate the village master in Krea
Use Krea Image with Nano Banana and write the first prompt without reference inputs. Krea documents the model and the use of uploaded images with written reference instructions, which we will need for the later views. Model availability depends on what your account currently offers. Krea image generation
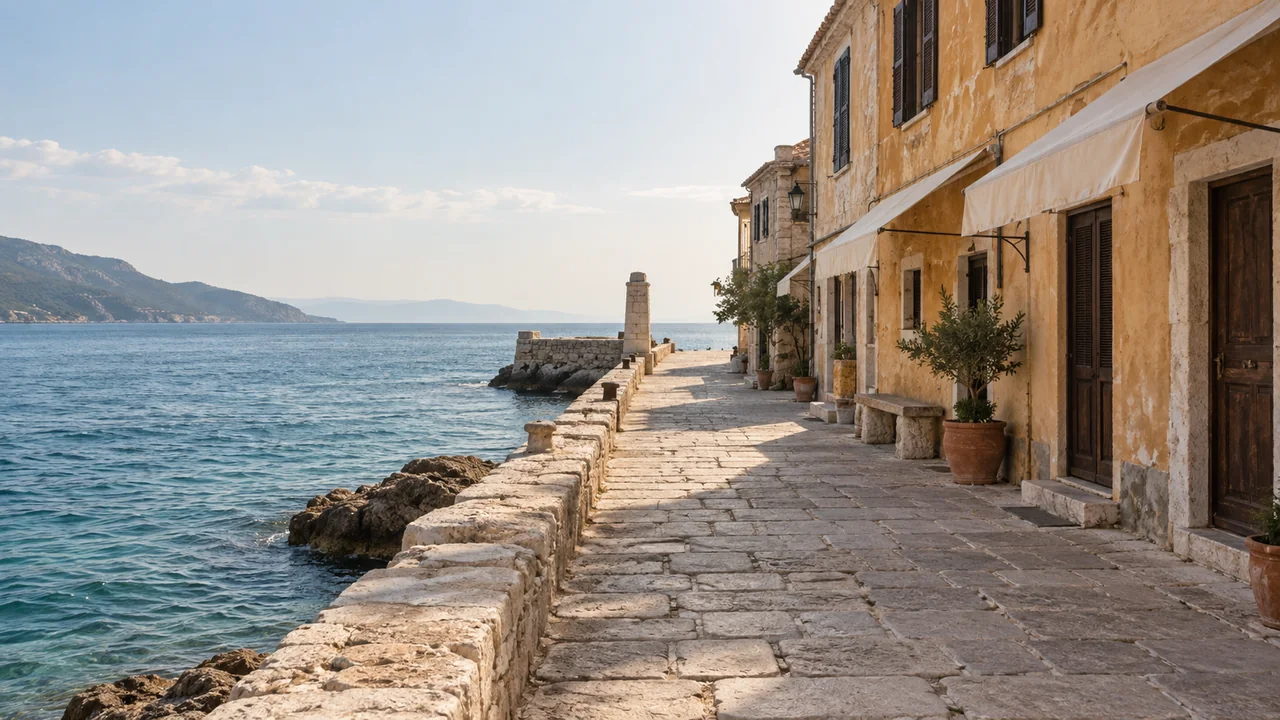
Input: text only. Settings: aim for 16:9. When a selected mode does not expose that ratio, leave sufficient room and crop the approved image before making the related stills. Keep the cropped version as the shared master.
Create one realistic landscape photograph of an entirely fictional small coastal village. From a low viewpoint at the entrance to a pale stone promenade, the calm sea lies on screen-left and a short row of two-storey ochre houses lies on screen-right. One square pale stone harbour marker stands at the far end of the promenade. Modest wooden windows, plain cream awnings, simple masonry, no famous landmarks or readable signs. Clear morning light comes from ahead and slightly right, with thin haze on the distant water. Wide composition with the sea horizon level and enough space around the promenade for a landscape crop.Inspect the master at full size. Windows need plausible spacing, the promenade must connect to the marker and the sea must remain on one side of the walkway. Reject an image with a staircase ending in mid-air or a harbour wall that changes thickness halfway along. Video motion will not make those defects disappear.
2. Make two views from the same place
Attach the cropped master in Krea's image workflow with Nano Banana. Request each still separately. The reference establishes the visual location, while the prompt changes the viewpoint. It cannot guarantee an accurate reconstruction of hidden geometry, so accept only views that agree with the visible landmarks.
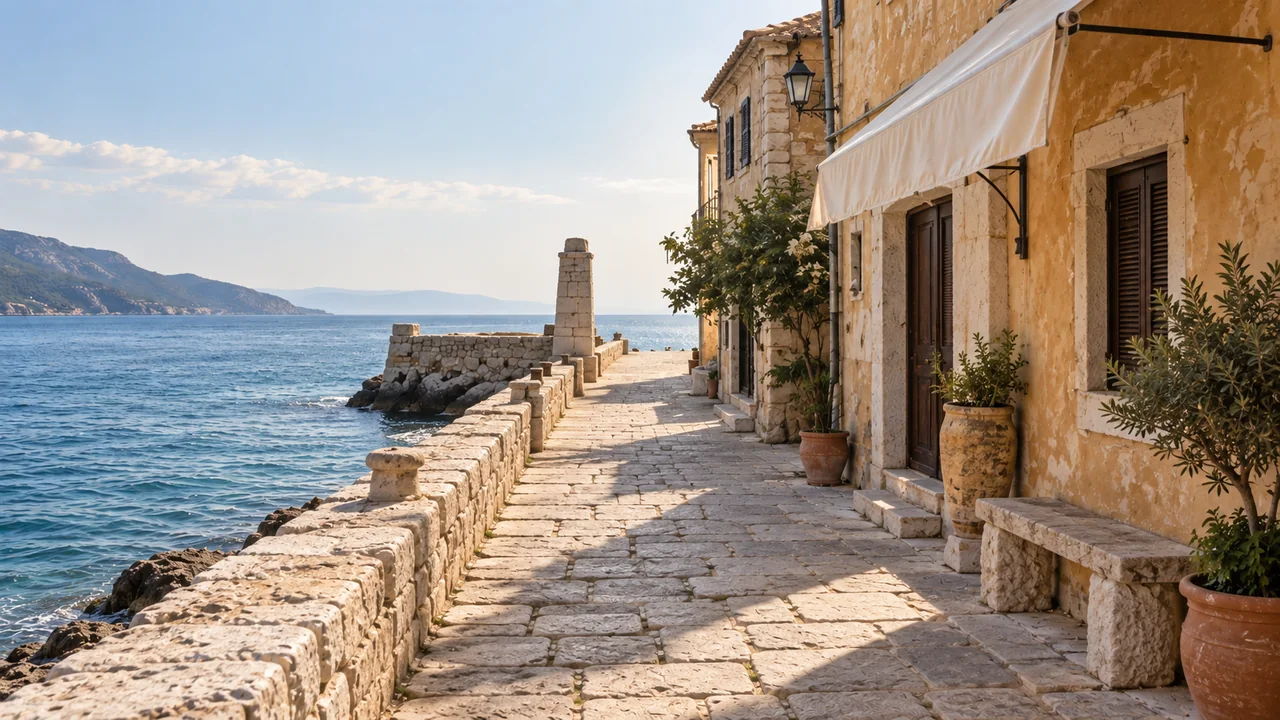
Walkway input: the approved master. Settings: match the final 16:9 crop.
Use the attached image as the reference for the same fictional coastal village. Create one eye-level view from halfway along that same promenade, still looking toward the square stone harbour marker. Keep the sea on screen-left and the ochre house fronts on screen-right. One plain cream awning extends from a house on the right; its cloth hangs loosely. Preserve the pale paving stones, wooden windows, clear morning weather and light arriving from ahead and slightly right. The walkway is empty and its path to the marker remains visible.Water-detail input: the same master, with the walkway still as an additional reference only if the active model accepts it.
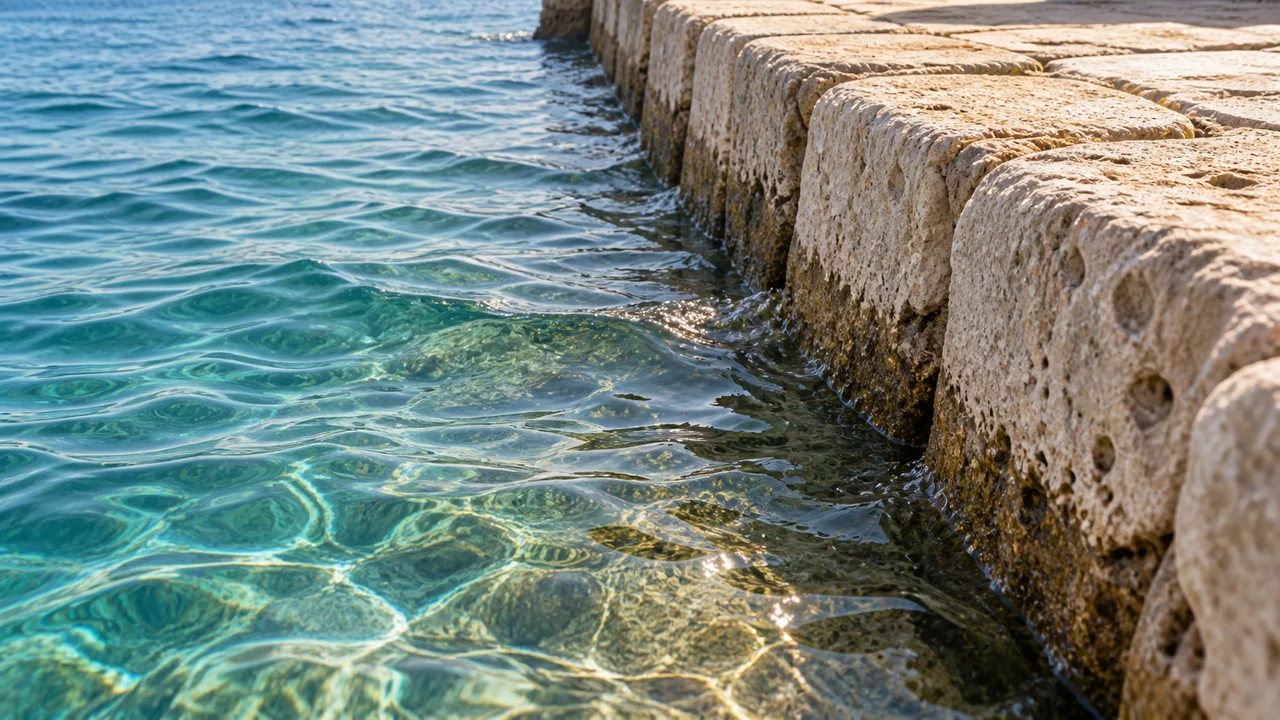
Use the attached village reference for the same location and morning light. Create one low close view beside the outer stone edge of the promenade. Pale weathered stone occupies the right third of the image and calm clear seawater occupies the left. The edge runs from the lower right toward the upper centre. A small natural ripple approaches the stone. Preserve the original stone colour and the light coming from upper right. Tight composition, no new buildings, boats or people.Compare the stone colour across all three images before animating. If the close view turns the paving into marble or adds a different coastline, fix the still. A narrow revision is easier to judge than adding more adjectives to the entire scene:
Match the stone surface in this close view to the pale weathered masonry in the master reference. Preserve the current composition, waterline, camera height and light direction. Change only the material and colour of the stone; keep its edge in the same position. Return one corrected still.3. Animate water and camera in separate shots
Krea documents Hailuo 2.3 with an uploaded start frame. Use that model if accessible, six seconds per clip and matching aspect ratio. Select a supported draft resolution first. Avoid an end frame for this initial pass; each prompt already has one simple movement to evaluate. Krea video workflow
Shot 1, start image: village master. The camera advances a little; it does not fly across the entire harbour.
The camera moves slowly forward a short distance along the promenade, maintaining level height and a level horizon. Keep the village layout, houses and harbour marker fixed in place. The sea carries small gentle ripples while the morning light remains steady. End with a slightly closer view of the same walkway. One continuous restrained movement.Shot 2, start image: approved walkway view. Here the camera stops. A single piece of moving cloth supplies life without forcing a new viewpoint.
A light breeze lifts the loose edge of the cream awning once, then the cloth settles under its own weight. Keep the camera completely locked on the promenade. Preserve the house fronts, paving and harbour marker from the start image. The light stays constant and the sea remains calm.Shot 3, start image: approved water detail. Make the water motion small enough for the starting sea state.
One small wavelet reaches the stone edge, rises slightly against it and recedes. A narrow strip of wet stone remains darker just above the waterline as the water pulls back. Keep the camera still and preserve the stone edge and morning light. The water moves gently with continuous surface ripples; the solid masonry remains unchanged.If the selected Krea model is unavailable, Higgsfield documents image models including Nano Banana Pro and a route from images to video. Its Kling 3.0 guide documents start-frame inputs. Use those for the corresponding stages, with settings supported by your account. You do not need the two products to produce identical model menus. Higgsfield AI Image, Higgsfield Kling 3.0
Fix the illusion before adding a colour grade
For the first clip, track the harbour marker: it should grow slightly as the camera approaches, not move independently along the path. For the second, check the awning's attachment to the wall. For the third, look for water passing through the stone or the edge dissolving during the wave.
If the horizon bends, reduce the forward movement or use a locked version of the master. If the awning melts, shorten its lift and retain the original attachment points. If the water becomes a storm, remove the wave instruction and ask only for small surface ripples. Keep the same source image while testing each repair so you can identify what changed.
Reject a clip that invents a new building halfway through. A later cut can conceal a weak ending, but it cannot make an incoherent place reliable travel information.
 Visit Higgsfield ↗
Edit an 18-second visit to a place that does not exist
Download approved clips into your editor and arrange arrival, walkway and water detail. Start with six seconds each, then trim whenever the useful movement ends. Use straight cuts. Match the colour of the stone and the brightness of the sea before applying a mild shared grade.
Add one continuous coastal ambience you recorded or have permission to use. Keep it under all three clips so the change of framing does not create three unrelated soundscapes. Music is optional; a quiet wave and a brief cloth flutter can carry this small film.
Add “Imagined coast — AI-generated location” as a readable title or caption in the editor. Do not present it as footage from a named real destination. Export in 16:9 at the source frame rate and a supported resolution, then inspect the actual exported file for warped edges, colour jumps and legible labeling. For a larger camera move, practice the four-movement comparison first.
Questions before the next location
Can I replace the village with a real city name?
That changes the task. A name alone does not verify buildings or geography. For factual travel content, ground the work in accurate material and make generated or altered imagery clear to the viewer.
Why not generate three unrelated beautiful scenes?
You can make an abstract mood reel that way. This exercise aims to suggest one visit, so repeated stone, houses, light and water need to agree.
Should the camera move in every shot?
No. One approach shot followed by two still viewpoints creates a change of pace and lets the viewer notice details. Use movement where it reveals something.
Do I need to buy access to several video models?
Start with one accessible start-image model and check the charge for a short trial. More model choices help only if you have a specific failure to compare. The image and video finder can help you locate the required workflow without assuming access is included in every plan.
Sources
Official documentation checked September 9, 2026. No real location, account entitlement or output from Krea or Higgsfield was verified through this exercise.